Introduction

We live in the age of pixels. As designers & developers of the web, pixels can be both our friends and our enemies. We want everything to look nice and sharp for anyone who uses any of the websites we work on, but we need to keep file sizes down for performance. There is pretty much only one way to go with icons, logos and illustrations on the web — SVG. Scalable Vector Graphics can look crisp at all screen resolutions, can have super small file sizes, and can be easily edited and modified.

This guide aims to give a practical overview of how you can use SVGs on your websites — with some tips and tricks along the way to get the most out of them.

SVG

Scalable Vector Graphics are an XML based markup that can contain two-dimensional vectors. The vectors can be simple shapes, paths, or well just about anything you can do in Illustrator. It’s an image format that has more in common with a web page that it does with a JPEG. SVG is much more powerful than other image formats we can use on the web as we can manipulate them with code (either in our text editor or with CSS / JS).

  • Resolution independent
  • Supported by all modern browsers
  • Future-proof (W3C standard)
  • Easy to make and edit
  • Manipulatable with CSS & JS
  • Highly compressible

Preparing an SVG for use on the web is a simple process and no more complicated that exporting a JPEG or PNG. Work as you typically would in your preferred vector graphics editor (Illustrator, Sketch, Inkscape [free], etc [or even Photoshop if you use shape layers]) with the graphic at the size that you expect to use it. I’ll explain a few things I do using Illustrator as that is what I typically use, but the same principles apply to any software. You’ll probably want to convert any text to outlines as it most likely will not show in the correct font unless you plan on styling them with a web font you are using on the page (which you can do!). Don’t worry about expanding all your objects to solid shapes, particularly if you have strokes as you may want to manipulate these on the page and expanding them typically doesn’t make the file size any smaller. Any names you put on layers / groups will be added in to the SVG as an ID on that element. This can be handy for styling, but will add a little to the overall file size.

To export, check that the design is sitting in an area of whole pixels (i.e. not 23.3px × 86.8px) otherwise it may not actually be crisp and then crop the artboard around it. You can do this in Illustrator with Object > Artboards > Fit to Artwork Bounds. Next hit save as and choose SVG and use the default settings. You can do some optimising here, but it isn’t really worth it as we will be post-processing them to optimise and any time spend playing with these settings is wasted.

Tips for smaller file sizes

(See the resources for external article links)

There are a number of good articles on SVG optimisation on the web which offer a wealth of knowledge on this subject, but I would like to share a few tips and tricks that I have found to be most effective and useful for me. They don’t take much extra work and can be easily added in to your workflow.

To keep your SVGs as small as possible you effectively want to remove anything unnecessary. The most well known and best (at least I think so) tool to post process SVGs is SVGO. This strips out all the code that isn’t needed — note: remember to be careful when using this if you plan to manipulate with CSS / JS as it can sometimes over-optimise your files making them harder to do what you planned to with them later on. A very handy thing with SVGO is it can be added to your build process so it is automatic (or you can use a GUI to do it yourself if you prefer).

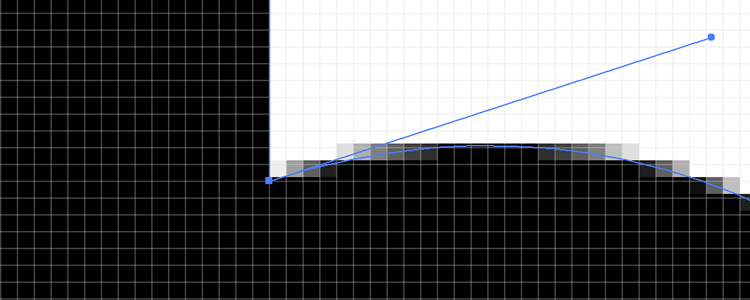
Taking things a step further in ‘removing anything unnecessary’ we can do some more in the graphics editor. First you want to make sure you are using as few paths / shapes as possible to achieve what you want and also that there are as few points on these paths as possible. You want to combine and simplify anything that you can. Then you want to remove as many points from your paths as possible. VectorScribe is an Illustrator plugin that has as part of it a Smart Remove Brush Tool — this allows you to remove points whilst still keeping the overall shape the same.

Pre optimisation

Pre optimisation

Smart Remove Brush Tool removed point

Post optimisation

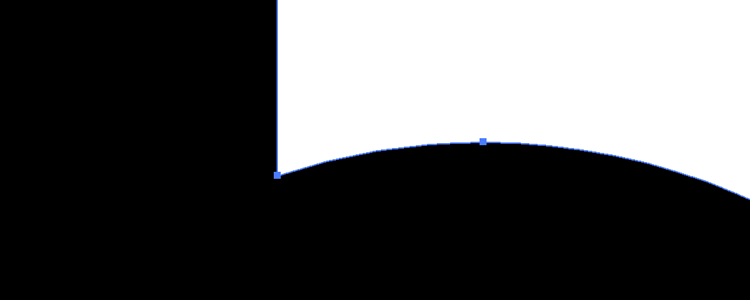
Next you are going to want to zoom in. In Illustrator you will want to enable the Pixel Preview with View > Pixel Preview and take a look at where your path points sit. For the smallest file sizes you want these to sit on the pixel grid (i.e. at whole pixel values). This takes a little bit of time to snap them all in place but is worth the extra bit of effort as this also ensures the sharpest rendering (notice how before you can end up with some half-pixel areas).

Points off pixels

Points off pixels

Pixel snapped

Pixel snapped

If you have two (or more) shapes that align you will want to remove any unneeded overlap. A thing to look out for is they can appear to have a thin white line between them even if the paths align, so sometimes you need to overlap them a little to prevent this. Note: in SVG the z-index is defined by the order they appear in the file with the bottom being the highest, so put the top shape at the bottom of the file in the code.

Post optimisation

Last but not least, one thing that is often forgotten about, remember to enable gzip compression for SVGs on your websites in the .htaccess file.

AddType image/svg+xml svg svgz
<IfModule mod_deflate.c>
    <IfModule mod_filter.c>
        AddOutputFilterByType DEFLATE "image/svg+xml" \
                                      "text/css" \
                                      "text/html" \
                                      "text/javascript"
                                      ... etc
    </IfModule>
</IfModule>

As an example of how effective these techniques can be, I took the original Breaking Borders logo and optimised it thusly: re-sized it to as large as it needed to be, tidied the paths, removed as many points as possible, moved the points to whole pixel values, removed as much of the overlapping area as possible, and put it through SVGO.

Original: 1,413b

Breaking Borders Logo

Optimised: 409b

Breaking Borders Logo

All in all that makes it ~71% smaller (and ~83% smaller if gzipped)

ADDITION: Rob Sterlini pointed out that as the ‘b’ is repeated you could probably use a <use> element to repeat it which might make it smaller — and he was totally right.

Optimised further with <use>: 311b

Breaking Borders Logo

~78% smaller

If you do this to all the SVGs on a site it can really add up.

When it comes to using SVGs on the web there are a number of different ways you can go. Some of them have benefits which can be useful depending on what you would like to achieve and some of them are best to be avoided. If you want to just keep things basic to get the resolution independence and file size benefits you can reference the SVG in an img or as a background-image in CSS just as you would any other image format.

Img

Just as you would with any other image. You can also use SVGs in a <picture> element. Note that this method limits manipulation functionality.

<img src="bblogo.svg" alt="Breaking Borders Logo" height="65" width="68">
Breaking Borders Logo

Background-image

It’s best not to base64 encode them as it this will block the loading of the rest of the styles while it downloads. Note that this method limits manipulation functionality.

.logo {
  background-image: url(bblogo.svg);
}

Iframe

You can load SVGs in an <iframe>. It does let you do most things, but I’m not sure it is the best method to use moving forward ¯\_(ツ)_/¯.

<iframe src="bblogo.svg">Your browser does not support iframes</iframe>

Embed

<embed> is meant to be used to integrate ‘an external application’ or ‘interactive content’. You can use it for SVGs but yea probably just don’t.

<embed type="image/svg+xml" src="bblogo.svg" />

Object

<object> is pretty much the best option to use if you want to be able to manipulate an SVG without having to put it inline in your HTML.

<object type="image/svg+xml" data="bblogo.svg">Your browser does not support SVGs</object>
Your browser does not support SVGs

Inline

Putting your SVG code inline will save an HTTP request but it will mean the image isn’t cached by the browser. It is the easiest way to manipulate, however maintaining inline SVG code can be a pain.

<svg xmlns="http://www.w3.org/2000/svg" viewBox="0 0 68 65">
  <path fill="#1A374D" d="M42 27v-20c0-3.7-3.3-7-7-7s-7 3.3-7 7v21l12 15-7 15.7c14.5 13.9 35 2.8 35-13.7 0-13.3-13.4-21.8-26-18zm6 25c-3.9 0-7-3.1-7-7s3.1-7 7-7 7 3.1 7 7-3.1 7-7 7z"/>
  <path d="M14 27v-20c0-3.7-3.3-7-7-7s-7 3.3-7 7v41c0 8.2 9.2 17 20 17s20-9.2 20-20c0-13.3-13.4-21.8-26-18zm6 25c-3.9 0-7-3.1-7-7s3.1-7 7-7 7 3.1 7 7-3.1 7-7 7z"/>
</svg>

To Conclude

If you want to get the most out of your SVGs use <object>. Alternatively you can use them inline to save the HTTP request, but note that it will not be cached. If you just want to use SVGs as you would any other image use <img> or a background-image. You have the ability to use <iframe> and <embed> but I don’t think they are the best options going forward (and for the purposes of this site, I will not focus on them any longer).

Object Inline Img Background-image
CSS Manipulation Yes Yes Some inline Some inline
JS Manipulation Yes Yes No No
SVG Animation Yes Yes Yes Yes
Interactive SVG Animation Yes Yes No No

Note: ‘Some inline’ means somethings work, but only if the CSS <style> is embedded within the SVG code. More info on this in the next section.

One of the great things with using an SVG is we can change how elements within it are styled using good old CSS. Say we have an orange icon and we want it to be blue on some pages, we can do that without having to make a new blue icon. Ideal.

There are two ways we can change styles — inline in the SVG and externally (i.e. within our stylesheet). To put styles inline, wrap them in a <style> tag and also within <![CDATA[ ... ]]>. It’s best to do this as sometimes XML parsers can conflict with certain characters (i.e. >). Even if you don’t have any funky characters in there now, it is best practice to use CDATA as some could be added at a later time and break all the things.

Inline styles will mostly work in all implementations. <img> and background-image don’t support CSS3 animations even if they are inline (see section on animations for more). background-image doesn’t support inline media queries (see section on media queries for more).

Inline styles

Your browser does not support SVGs
<svg xmlns="http://www.w3.org/2000/svg" viewBox="0 0 68 65">
  <style type="text/css">
    <![CDATA[
    .firstb { fill: yellow; }
    .secondb { fill: red; }
    ]]>
  </style>
  <path class="secondb" d="M42 27v-20c0-3.7-3.3-7-7-7s-7 3.3-7 7v21l12 15-7 15.7c14.5 13.9 35 2.8 35-13.7 0-13.3-13.4-21.8-26-18zm6 25c-3.9 0-7-3.1-7-7s3.1-7 7-7 7 3.1 7 7-3.1 7-7 7z"/>
  <path class="firstb" d="M14 27v-20c0-3.7-3.3-7-7-7s-7 3.3-7 7v41c0 8.2 9.2 17 20 17s20-9.2 20-20c0-13.3-13.4-21.8-26-18zm6 25c-3.9 0-7-3.1-7-7s3.1-7 7-7 7 3.1 7 7-3.1 7-7 7z"/>
</svg>

If you want to use external styles, which are mostly much easier to work with and maintain, you can’t use <img> or background-image. If you are using <object> you need to reference your stylesheet internally from the SVG file (see code following). Remember: if you do this the SVG will also not be able to know what its parent class is (i.e. the <object>) so don’t try to use that in its styling. Inline SVGs don’t need this added and therefore can be slightly easier to work with in this sense.

External styles

Your browser does not support SVGs
// Add to very start of SVG file before <svg>
<?xml-stylesheet type="text/css" href="style.css"?>
// In style.css
.firstb { fill: yellow; }
.secondb { fill: red; }

My JavaScript knowledge is pretty minimal, so I’m just going to point out some basic tips on how you can use JS to change things in an SVG. If you want to embed your scripts within the SVG file, remember to wrap them in <![CDATA[ ... ]]> again to prevent parsing errors. Scripts will not run if you use <img> or background-image as a security measure (i.e. to prevent potentially malicious code running on your page).

When working with external JS (i.e. not embeded within the SVG file), if you have your SVG inline you can target it as you would any other DOM element. If you use an <object> you can target it with contentDocument. You can get much more creative than the following, but here is an example:

External scripts

Your browser does not support SVGs
window.onload=function() {
  var object = document.getElementById("logoObject");
  var svgDocument = object.contentDocument;
  var svgb1 = svgDocument.getElementsByClassName("firstb");
  var svgb2 = svgDocument.getElementsByClassName("secondb");
  svgb1[0].setAttribute("fill", "yellow");
  svgb2[0].setAttribute("fill", "red");
};

When using images on the web in responsive designs there are two options you can use to style them, you can keep them at a fixed-size and adjust at breakpoints if needed, or allow them to resize with the page depending on their parent container.

If they are a fixed size the only thing you need to be careful of is if you are using the SVG as a background-image you need to make sure to include a background-size because browsers can get a bit confused and either crop it or shrink it, particularly if you are showing it at a different size to the actual size of the image.

When implementing an SVG that can resize there are a couple of things to remember (again mostly with the background-image implementation) as outlined here:

Object

Works as expected with width: 100%;

Your browser does not support SVGs

Inline

Previously needed a max-height value to work, of recent works as expected. Note Safari doesn’t redraw these as quickly (if they are complex) on window resize.

Img

Works as expected with width: 100%;

Breaking Borders Logo

Background-image

Needs padding-bottom: #%; to keep the proportions of the image else it will not show.

When it comes to animating SVGs there are a few different options that we can use — SVG animation (based on the SMIL spec), CSS3 animations, or JS animations. SVG animation and CSS3 animations let you do most things you will want to do — with SVG animation being slightly more powerful in that it has control over a few extra things. JavaScript allows you to do some pretty complex animations relatively easily, especially with libraries such as Snap.svg. This is a little beyond my knowledge of JavaScript so I’ll let you check out their demos to see for yourself if that is the right option.

SVG animation is super powerful but I’m not going to go in to too much depth on it as to be honest I’ve not really ever used it. I can imagine it being useful for illustrations that you would like to have some nice animations happening with, but from a practical point of view not every project has the time or budget to spend on this. If you do, it is actually pretty simple to start playing around with and there are some great tutorials online. Basically you can add a child element of <animate> to any paths and shapes in your SVGs which will control the animations. The best thing about it is, it works in all implementation methods. Internet Explorer does not support SVG animation, however you can use a polyfill such as FakeSmile if you need it to work in IE too.

Here’s a little demo to show you. Note: I’ve lightened the blue to make it easier to see the animation.

<svg xmlns="http://www.w3.org/2000/svg" viewBox="0 0 68 65">
  <path fill="#4e86b1" d="M42 27v-20c0-3.7-3.3-7-7-7s-7 3.3-7 7v21l12 15-7 15.7c14.5 13.9 35 2.8 35-13.7 0-13.3-13.4-21.8-26-18zm6 25c-3.9 0-7-3.1-7-7s3.1-7 7-7 7 3.1 7 7-3.1 7-7 7z">
    <animate dur="2s" values="#000000; #4e86b1; #000000" keyTimes="0; 0.5; 1" attributeName="fill" repeatCount="indefinite"/>
  </path>
  <path d="M14 27v-20c0-3.7-3.3-7-7-7s-7 3.3-7 7v41c0 8.2 9.2 17 20 17s20-9.2 20-20c0-13.3-13.4-21.8-26-18zm6 25c-3.9 0-7-3.1-7-7s3.1-7 7-7 7 3.1 7 7-3.1 7-7 7z">
    <animate dur="2s" values="#4e86b1; #000000; #4e86b1" keyTimes="0; 0.5; 1" attributeName="fill" repeatCount="indefinite"/>
    </path>
</svg>

SVG animation

Object

Your browser does not support SVGs

Inline

Img

Breaking Borders Logo

Background-image

Often when we want to animate icons or illustrations on the web it will be for an interaction, i.e. on hover etc. This falls under CSS Manipulation and Interactive SVG Animation in the table of support above and thus doesn’t work for either SVG animation or CSS3 animations if you use <img> or background-image. To get interactive animations in SVG animation we can add begin="mouseover" & begin="mouseout" and with CSS3 animations just as you would anywhere else — add classes to the SVG elements and style them on hover. One thing to note is, if you want to style the animations from your external stylesheet it will work as expected if you have the SVG inline, but if you use <object> you will need to reference the external stylesheet from within the SVG too.

Interactive SVG animation

Only works with <object> or inline.

Your browser does not support SVGs
<svg xmlns="http://www.w3.org/2000/svg" viewBox="0 0 68 65">
  <path fill="#4e86b1" d="M42 27v-20c0-3.7-3.3-7-7-7s-7 3.3-7 7v21l12 15-7 15.7c14.5 13.9 35 2.8 35-13.7 0-13.3-13.4-21.8-26-18zm6 25c-3.9 0-7-3.1-7-7s3.1-7 7-7 7 3.1 7 7-3.1 7-7 7z">
    <animate fill="freeze" dur="0.1s" to="#000000" from="#4e86b1" attributeName="fill" begin="mouseover"/>
    <animate fill="freeze" dur="0.1s" to="#4e86b1" from="#000000" attributeName="fill" begin="mouseout"/>
  </path>
  <path d="M14 27v-20c0-3.7-3.3-7-7-7s-7 3.3-7 7v41c0 8.2 9.2 17 20 17s20-9.2 20-20c0-13.3-13.4-21.8-26-18zm6 25c-3.9 0-7-3.1-7-7s3.1-7 7-7 7 3.1 7 7-3.1 7-7 7z">
    <animate fill="freeze" dur="0.1s" to="#4e86b1" from="#000000" attributeName="fill" begin="mouseover"/>
    <animate fill="freeze" dur="0.1s" to="#000000" from="#4e86b1" attributeName="fill" begin="mouseout"/>
  </path>
  </svg>

CSS3 animation

Only works with <object> or inline. Also works with external CSS as explained previously.

Your browser does not support SVGs
<svg xmlns="http://www.w3.org/2000/svg" viewBox="0 0 68 65">
  <style type="text/css">
    <![CDATA[
    .firstb { fill: #000; transition: fill 0.1s; }
    .firstb:hover { fill: #4e86b1; }
    .secondb { fill: #4e86b1; transition: fill 0.1s; }
    .secondb:hover { fill: #000; }
    ]]>
  </style>
  <path class="secondb" d="M42 27v-20c0-3.7-3.3-7-7-7s-7 3.3-7 7v21l12 15-7 15.7c14.5 13.9 35 2.8 35-13.7 0-13.3-13.4-21.8-26-18zm6 25c-3.9 0-7-3.1-7-7s3.1-7 7-7 7 3.1 7 7-3.1 7-7 7z"/>
  <path class="firstb" d="M14 27v-20c0-3.7-3.3-7-7-7s-7 3.3-7 7v41c0 8.2 9.2 17 20 17s20-9.2 20-20c0-13.3-13.4-21.8-26-18zm6 25c-3.9 0-7-3.1-7-7s3.1-7 7-7 7 3.1 7 7-3.1 7-7 7z"/>
</svg>

You can create and use SVG sprites just as we typically do with PNGs and background-image to get the resolution benefits or you can take it a step further using the extra power we have with SVG. I’m not going to go in to too much depth here again as it does get pretty complex and I’ve never found a need to implement them personally. The benefit is getting all the power of SVG with fewer HTTP requests.

There are two approaches you can take — in the first you define all the icons within <symbol> elements in the SVG but hide them. Then reference each later when needed with a <use> element referencing the <symbol> with xlink:href="#id". The second uses the SVG viewbox attribute to crop the artboard (area of the SVG that shows) around a certain area. These are both quite advanced SVG uses so only worry about them if you want to use them.

If you do want to learn how to implement these techniques please take a look at the links in the resources, especially Sara Soueidan’s 24ways article.

If you want to use an SVG sprite just as you would a PNG sprite with CSS it is worth noting that you will need to add the width and height attributes back in alongside the viewBox attribute in the SVG code. During the optimising process these are typically removed because they aren’t usually needed. In this case however IE9 & 10 need them to be able to correctly crop to part of the image sprite. This is because those browsers take the width and height sizes specified in the CSS for the image size, but these are actually the sizes of the part of the image wanted (not the whole image). Confusing I know, but it is something I ran into recently.

A really cool thing about SVGs is, if you use media queries in the styles you embed within the file, instead of them working from the viewport size they will work from the SVGs viewport size. Basically that means they have their own working implementation of element queries out of the box. Nice. This allows us to control how the SVG will look at whatever size it is shown.

Imagine you are a big brand and you want people to use your logo correctly no matter what size it’s shown. Well you pretty much can! Just embed some media queries and you can change its formatting based on what size it is displayed at. This works with all implementations apart from background-image and in all browsers (note: IE9–11 seem to ignore some breakpoints). Have a play with the slider below to see an example of how that could work:


A word on fallbacks. SVGs are supported in all modern browsers. If you still have to support IE8 then you will need to implement fallbacks, most likely in the form of PNGs. I’m not going to go in to this much because you probably shouldn’t be supporting IE8 anymore ¯\_(ツ)_/¯. Anyway, if you do want fallbacks, basically things get pretty complicated pretty quickly as most things do with SVG. I would recommend to read this comprehensive article by Amelia Bellamy-Royds on CSS-Tricks.